How to host Google fonts locally
In response to our article Smart WebFont loading for better performance, we were asked what exact steps are to host Google webfonts locally. That is why we created this all inclusive tutorial on how to self-host Google fonts.
Why should I self-host Google fonts?
Why would you want to self-host Google fonts? Are Google fonts are fun, easy and fast enough? Well, not quite. They are fun and easy but never fast enough. There are 4 good reasons to host google fonts yourself:
- More control over fonts
Google fonts change regularly. With remote Google fonts, your font may look slightly different from one day to the next. To prevent this, you should download and host the font yourself to insure that fonts never change. - Faster loading times
Google's super fast edge servers can deliver a web font font to you at lightning speed. Unfortunately even the Google servers are never as fast as reusing the existing connection to your server that has already been established anyway. - More control over caching
Because Google hosted fonts can change regularly, Google sets the cache time (the time that your browser can locally store the font and the CSS) to only half an hour. Every half hour, an extra connection has to be set up again. With self hosted fonts you have full control over the cache time. - Effective pre-loading
Preloading indicates to a browser that a resource, in this case a font file, should be fetched as soon as possible with high priority. Preloading wil be unreliable when using Google fonts since the font url may change from day to day.
Self host Google fonts!
In this article we will show you in a few, easy to follow, steps how to self-host Google fonts. Hosting your own fonts should not take more than a few minutes. After this tutorial you will immediately enjoy a faster website. Don't want to follow the steps? Try this this handy tool that will do most of the work for you but you will not learn as much.
1. Select and use the font
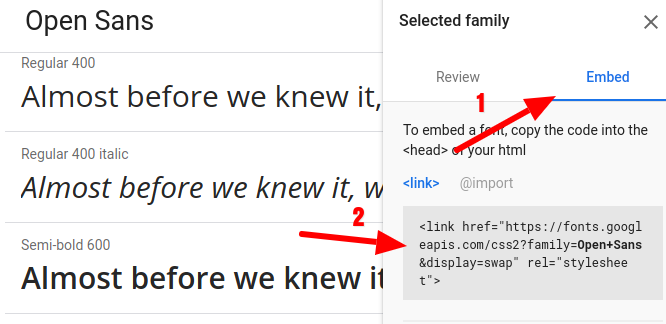
First choose the font you want to use. Navigate to Google fonts and choose a font. To get started, let's choose Open Sans 400.
Now click on embed to see the code you should place on your website. Copy the embed code and paste it in the head of your page. Next, to activate the font, add the font to the CSS on your page. For example body{font-family: 'Open Sans', sans-serif;}.
Great, you have successfully activated the Google-hosted webfont Open Sans on your page. That is a good first step. We can now download the font and start self-hosting it.
2. Inspect and download the font
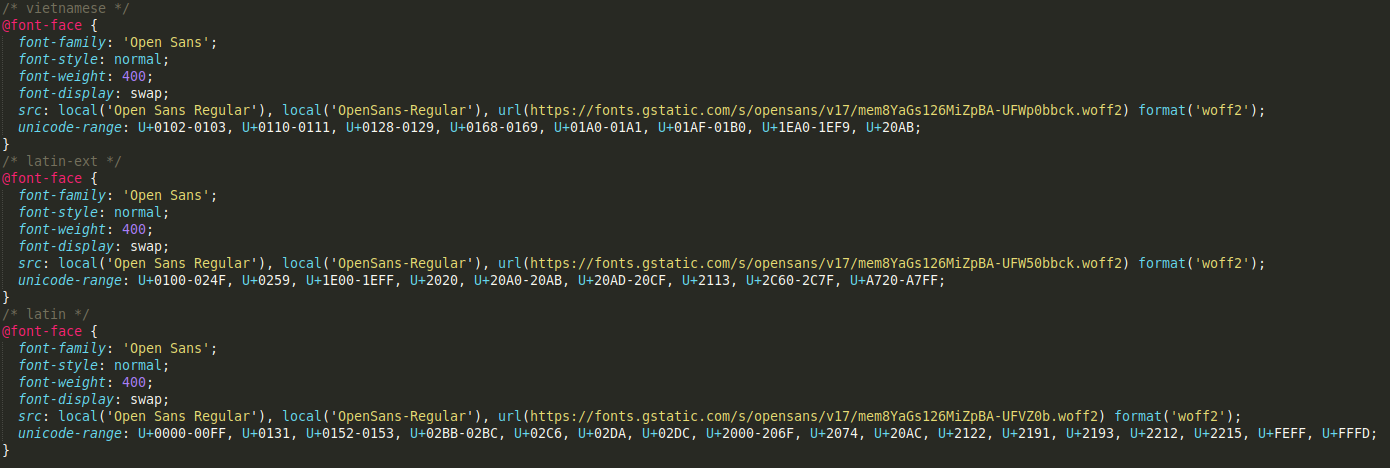
The embed code contains a link to a google-hosted CSS file. Copy that linkd and use your browser to navigate to the link. You will now see the font-face declarations used for the font. You might notice there is more then 1 font declaration. There are different font faces for different text encodings.
How do you know which of these font face declarations you need? You can easily check this via the devtools inspector. Use the shortcut Ctrl-Shift-I to open devtools. Naviagate to the network tab and click Font. Now refresh the page (Ctrl-r) to see which font is being loaded.
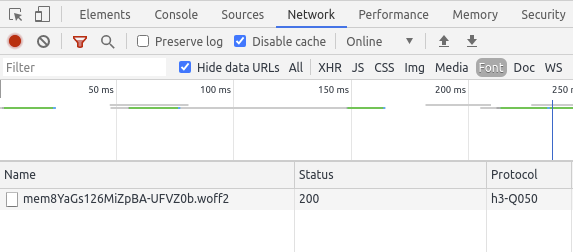
Compare this font to the list of fonts in the CSS file. There is only one match. That is thw font we need. Usually this is the latin version. Now download the font by copying it and pasting the url of the Google-hosted font in your browser. This will start a download of the font file.
3. Host and activate the font yourself
You are almost done. Now you only have to upload the font to your own server. Open your FTP program. Upload the font to your custom folder, for example '/fonts'.
Then copy the relevant font-face declaration from the original Google hosted CSS file and change the reference to the font until it looks like this:

4. Pre-loading
From now on, you can implement preloading because you are hosting the font locally yourself. This ensures that the font is downloaded with priority and is available to the browser as quickly as possible.
<link rel="preload" href="/fonts/mem8YaGs126MiZpBA-UFVZ0b.woff2" as="font" type="font/woff2" crossorigin>
5. Woff / woff2 and other formats
We have just downloaded and set up self hosting for the woff2 format from Google Font. All modern browsers (except internet explorer) support woff2. Woff2 is faster and smaller than all other font formats.
For internet explorer support you also need to download the woff file and link it in your CSS. Repeat steps 1 to 3 but this time use internet explorer as your browser. Checkthat, instead of a .woff2 font, Google now references a .woff font in the CSS. Download this font, upload it to your server and link it in the CSS like this:
@font-face {
   ....
   src: local('Open Sans Regular'),
        url('/fonts/opensans.woff2') format('woff2'),
        url('/fonts/opensans.woff') format('woff');
}Technical seo
a/b testing
Above the fold
Alt-tag
Anchor text
Black hat seo
Bounce rate
Broken links
Canonical tag
Cloaking
Content farm
Crawler
Duplicate content
Structured data
Google algorithm
Google Panda
Google penalty
Google penguin
Googlebot
Crawler Traps
Advanced Search operators
Inernal nofollow
Ranking Signal correlation
Google BERT
Linkuilding
Social Media
Website speed
Time to first byte
First Contentful Paint
Inline CSS
Defer JavaScript
Largest Contentful Paint
Resources
Smart WebFont loading for better performance
Icon fonts lazy loading
Improve page rendering with content-visibility
Analytics without Core Web Vitals delay
Self host Google fonts tutorial